A detailed walkthrough of the Metal³ development environment
Introduction to metal3-dev-env
The metal3-dev-env is a
collection of scripts in a GitHub repository inside the
Metal³ project that aims to
allow contributors and other interested users to run a fully functional
Metal³ environment for testing and have a first contact with the
project. Actually, metal3-dev-env sets up an emulated environment
which creates a set of virtual machines (VMs) to manage as if they were
bare metal hosts.
Warning
This is not an installation that is supposed to be run in production. Instead, it is focused on providing a development environment to test and validate new features.
The metal3-dev-env repository includes a set of scripts, libraries and
resources used to set up a Metal³ development environment. On the
Metal³ website
there is already a documented process on how to use the metal3-dev-env
scripts to set up a fully functional cluster to test the functionality
of the Metal³ components.
This procedure at a 10,000-foot view is composed of 3 bash scripts plus a verification one:
- 01_prepare_host.sh - Mainly installs all needed packages.
- 02_configure_host.sh - Basically create a set of VMs that will be managed as if they were bare metal hosts. It also downloads some images needed for Ironic.
- 03_launch_mgmt_cluster.sh - Launches a management cluster using minikube and runs the baremetal-operator on that cluster.
- 04_verify.sh - Finally runs a set of tests that verify that the deployment was completed successfully
In this blog post, we are going to expand the information and provide some hints and recommendations.
Warning
Metal³ project is changing rapidly, so probably this information is valuable in the short term. In any case, it is encouraged to double-check that the information provided is still valid.
Before getting down to it, it is worth defining the nomenclature used in the blog post:
- Host. It is the server where the virtual environment is running. In this case, it is a physical PowerEdge M520 with 2 x Intel(R) Xeon(R) CPU E5-2450 v2 @ 2.50GHz, 96GB RAM and a 140GB drive running CentOS 7 latest. Do not panic, lab environment should work with lower resources as well.
- Virtual bare metal hosts. These are the virtual machines (KVM based) that are running on the host which are emulating physical hosts in our lab. They are also called bare metal hosts even if they are not physical servers.
- Management or bootstrap cluster. It is a fully functional Kubernetes cluster in charge of running all the necessary Metal³ operators and controllers to manage the infrastructure. In this case it is the minikube virtual machine.
- Target cluster. It is the Kubernetes cluster created from the management one. It is provisioned and configured using a native Kubernetes API for that purpose.
Create the Metal³ laboratory
Information
A non-root user must exist in the host with password-less sudo access.
This user is in charge of running the metal3-dev-env scripts.
The first thing that needs to be done is, obviously, cloning the
metal3-dev-env repository:
[alosadag@eko1: ~]$ git clone https://github.com/metal3-io/metal3-dev-env.git
Cloning into 'metal3-dev-env'...
remote: Enumerating objects: 22, done.
remote: Counting objects: 100% (22/22), done.
remote: Compressing objects: 100% (22/22), done.
remote: Total 1660 (delta 8), reused 8 (delta 0), pack-reused 1638
Receiving objects: 100% (1660/1660), 446.08 KiB | 678.00 KiB/s, done.
Resolving deltas: 100% (870/870), done.
Before starting to deploy the Metal³ environment, it makes sense to detail a series of scripts inside the library folder that will be sourced in every step of the installation process. They are called shared libraries.
[alosadag@eko1:~]$ ls -1 metal3-dev-env/lib/
common.sh
images.sh
logging.sh
network.sh
Shared libraries
Although there are several scripts placed inside the lib folder that are
sourced in some of the deployment steps, common.sh and logging.sh
are the only ones used in all of the executions during the installation
process.
common.sh
The first time this library is run, a new configuration file is created
with several variables along with their default values. They will be
used during the installation process. On the other hand, if the file
already exists, then it just sources the values configured. The
configuration file is created inside the cloned folder with
config_$USER as the file name.
[alosadag@eko1 metal3-dev-env]$  ls config_*
config_alosadag.sh
The configuration file contains multiple variables that will be used during the set-up. Some of them are detailed in the setup section of the Metal³ try-it web page. In case you need to add or change global variables it should be done in this config file.
Note
I personally recommend modifying or adding variables in this config file instead of exporting them in the shell. By doing that, it is assured that they are persisted
[alosadag@eko1 metal3-dev-env]$ cat ~/metal3-dev-env/config_alosadag.sh
#!/bin/bash
#
# This is the subnet used on the "baremetal" libvirt network, created as the
# primary network interface for the virtual bare metalhosts.
#
# Default of 192.168.111.0/24 set in lib/common.sh
#
#export EXTERNAL_SUBNET="192.168.111.0/24"
#
# This SSH key will be automatically injected into the provisioned host
# by the provision_host.sh script.
#
# Default of ~/.ssh/id_rsa.pub is set in lib/common.sh
#
#export SSH_PUB_KEY=~/.ssh/id_rsa.pub
...
This common.sh library also makes sure there is an ssh public key
available in the user’s ssh folder. This key will be injected by
cloud-init in all the virtual bare metal machines that will be
configured later. Then, the user that executed the metal3-dev-env
scripts is able to access the target cluster through ssh.
Also, common.sh library also sets more global variables apart from
those in the config file. Note that these variables can be added to the
config file along with the proper values for your environment.
| Name of the variable | Default value |
|---|---|
| SSH_KEY | ${HOME}/.ssh/id_rsa |
| SSH_PUB_KEY | ${SSH_KEY}.pub |
| NUM_NODES | 2 |
| VM_EXTRADISKS | false |
| DOCKER_REGISTRY_IMAGE | docker.io/registry:latest |
| VBMC_IMAGE | quay.io/metal3-io/vbmc |
| SUSHY_TOOLS_IMAGE | quay.io/metal3-io/sushy-tools |
| IPA_DOWNLOADER_IMAGE | quay.io/metal3-io/ironic-ipa-downloader |
| IRONIC_IMAGE | quay.io/metal3-io/ironic |
| IRONIC_INSPECTOR_IMAGE | quay.io/metal3-io/ironic-inspector |
| BAREMETAL_OPERATOR_IMAGE | quay.io/metal3-io/baremetal-operator |
| CAPM3_VERSION | v1alpha3 |
| CAPBM_IMAGE | quay.io/metal3-io/cluster-api-provider-baremetal:v1alpha1 |
| CAPBM_IMAGE | quay.io/metal3-io/cluster-api-provider-baremetal |
| DEFAULT_HOSTS_MEMORY | 8192 |
| CLUSTER_NAME | test1 |
| KUBERNETES_VERSION | v1.17.0 |
| KUSTOMIZE_VERSION | v3.2.3 |
Information
It is important to mention that there are several basic functions defined in this file that will be used by the rest of scripts.
logging.sh
This script ensures that there is a log folder where all the information gathered during the execution of the scripts is stored. If there is any issue during the deployment, this is one of the first places to look at.
[alosadag@eko1 metal3-dev-env]$ ls -1 logs/
01_prepare_host-2020-02-03-122452.log
01_prepare_host-2020-02-03-122956.log
host_cleanup-2020-02-03-122656.log
First step: Prepare the host
In this first step (01_prepare_host.sh), the requirements needed to
start the preparation of the host where the virtual bare metal hosts
will run are fulfilled. Depending on the host’s operating system (OS),
it will trigger a specific script for CentOS/Red Hat or Ubuntu.
note: “Note” Currently
CentOS Linux 7,Red Hat Enterprise Linux 8andUbuntuhave been tested. There is work in progress to adapt the deployment for CentOS Linux 8.
As stated previously, CentOS 7 is the operating system chosen to run
in both, the host and virtual servers. Therefore, specific packages of
the operating system are applied in the following script:
- centos_install_requirements.sh This script enables
epelandtripleo(current-tripleo) repositories where several packages are installed:dnf,ansible,wget,python3and python related packages such aspython-virtualbmcfrom tripleo repository.
Note
Notice that SELinux is set to permissive and an OS update is
triggered, which will cause several packages to be upgraded since
there are newer packages in the tripleo repositories (mostly python
related) than in the rest of enabled repositories. At this point, the
container runtime is also installed. Note that by setting the variable
CONTAINER_RUNTIME defined in common.sh is possible to
choose between docker and podman, which is the default for CentOS.
Remember that this behavior can be overwritten in your config file.
Once the specific requirements for the elected operating system are
accomplished, the download of several external artifacts is executed.
Actually minikube, kubectl and kustomize are downloaded from the
internet. Notice that the version of Kustomize and Kubernetes is defined
by KUSTOMIZE_VERSION and KUBERNETES_VERSION variables inside
common.sh, but minikube is always downloading the latest
version available.
The next step deals with cleaning ironic containers and pods that
could be running in the host from failed deployments. This will ensure
that there will be no issues when creating ironic-pod and infra-pod
a little bit later in this first step.
- network.sh.
At this point, the network library script is sourced. As expected, this library deals with the network configuration which includes: IP addresses, network definitions and IPv6 support which is disabled by default by setting
PROVISIONING_IPV6variable:
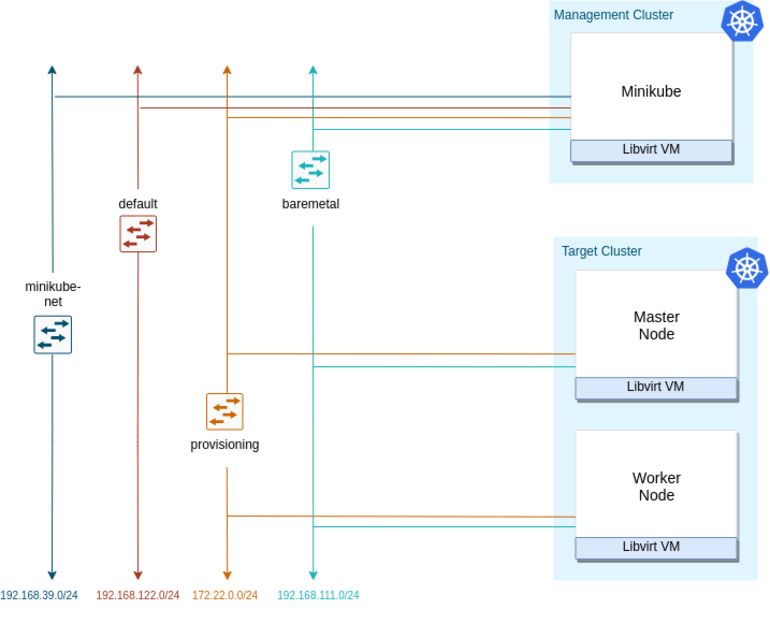
Name of the variable Default value Option PROVISIONING_NETWORK 172.22.0.0/24 This is the subnet used to run the OS provisioning process EXTERNAL_SUBNET 192.168.111.0/24 This is the subnet used on the “baremetal” libvirt network, created as the primary network interface for the virtual bare metal hosts LIBVIRT_FIRMWARE bios PROVISIONING_IPV6 false Below it is depicted a network diagram of the different virtual networks and virtual servers involved in the Metal³ environment:
- images.sh.
The
images.shlibrary file is sourced as well in script01_prepare_host.sh. Theimages.shscript contains multiple variables that set the URL (IMAGE_LOCATION), name (IMAGE_NAME) and default username (IMAGE_USERNAME) of the cloud image that needs to be downloaded. The values of each variable will differ depending on the operating system of the virtual bare metal hosts. Note that these images will be served from the host to the virtual servers through the provisioning network.In our case, since
CentOS 7is the base operating system, values will be defined as:
Name of the variable Default value IMAGE_NAME CentOS-7-x86_64-GenericCloud-1907.qcow2 IMAGE_LOCATION https://cloud.centos.org/centos/7/images/ IMAGE USERNAME centos
Information
In case it is expected to use a custom cloud image, just modify the previous variables to match the right location.
Now that the cloud image is defined, the download process can be
started. First, a folder defined by IRONIC_IMAGE_DIR should exist so
that the image (CentOS-7-x86_64-GenericCloud-1907.qcow2) and its
checksum can be stored. This folder and its content will be exposed
through a local ironic container running in the host.
| Name of the variable | Default value |
| IRONIC_IMAGE_DIR | /opt/metal3-dev-env/ironic/html/images |
Below it is verified that the cloud image files were downloaded successfully in the defined folder:
[alosadag@eko1 metal3-dev-env]$ ll /opt/metal3-dev-env/ironic/html/images
total 920324
-rw-rw-r--. 1 alosadag alosadag 942407680 Feb  3 12:39 CentOS-7-x86_64-GenericCloud-1907.qcow2
-rw-rw-r--. 1 alosadag alosadag        33 Feb  3 12:39 CentOS-7-x86_64-GenericCloud-1907.qcow2.md5sum
Once the shared script images.sh is sourced, the following container
images are pre-cached locally to the host in order to speed up things
later. Below is shown the code snippet in charge of that task:
+ for IMAGE_VAR in IRONIC_IMAGE IPA_DOWNLOADER_IMAGE VBMC_IMAGE SUSHY_TOOLS_IMAGE DOCKER_REGISTRY_IMAGE
+ IMAGE=quay.io/metal3-io/ironic
+ sudo podman pull quay.io/metal3-io/ironic
...
....
The container image location of each one is defined by their respective variables:
| Name of the variable | Default value |
|---|---|
| VBMC_IMAGE | quay.io/metal3-io/vbmc |
| SUSHY_TOOLS_IMAGE | quay.io/metal3-io/sushy-tools |
| IPA_DOWNLOADER_IMAGE | quay.io/metal3-io/ironic-ipa-downloader |
| IRONIC_IMAGE | quay.io/metal3-io/ironic |
| DOCKER_REGISTRY_IMAGE | docker.io/registry:latest |
Information
In case it is expected to modify the public container images to test new features, it is worth mentioning that there is a container registry running as a privileged container in the host. Therefore it is recommended to upload your modified images there and just overwrite the previous variables to match the right location.
At this point, an Ansible role is run locally in order to complete the local configuration.
ansible-playbook \
  -e "working_dir=$WORKING_DIR" \
  -e "virthost=$HOSTNAME" \
  -i vm-setup/inventory.ini \
  -b -vvv vm-setup/install-package-playbook.yml
This playbook imports two roles. One is called packages_installation,
which is in charge of installing a few more packages. The list of
packages installed are listed as default Ansible variables in the
vm-setup role inside the metal3-dev-env
repository.
The other role is based on the
fubarhouse.golang
Ansible Galaxy role. It is in charge of installing and configuring the
exact golang version 1.12.12 defined in an Ansible variable in the
install-package-playbook.yml
playbook
Once the playbook is finished, a pod called ironic-pod is created.
Inside that pod, a privileged ironic-ipa-downloader container is
started and attached to the host network. This container is in charge of
downloading the Ironic Python
Agent (IPA)
files to a shared volume defined by IRONIC_IMAGE_DIR. This folder is
exposed by the ironic container through HTTP.
Information
The Ironic Python Agent is an agent for controlling and deploying Ironic controlled baremetal nodes. Typically run in a ramdisk, the agent exposes a REST API for provisioning servers.
See below the code snippet that fulfils the task:
sudo podman run -d --net host --privileged --name ipa-downloader \
  --pod ironic-pod -e IPA_BASEURI= -v /opt/metal3-dev-env/ironic:/shared \
  quay.io/metal3-io/ironic-ipa-downloader /usr/local/bin/get-resource.sh
Below is shown the status of the pods and containers at this point:
[root@eko1 metal3-dev-env]# podman pod list --ctr-names
POD ID         NAME         STATUS    CREATED      CONTAINER INFO                                             INFRA ID
5a0d475351aa   ironic-pod   Running   6 days ago   [5a0d475351aa-infra] [ipa-downloader]                      18f3a8f61407
The process will wait until the ironic-python-agent (IPA) initramfs,
kernel and headers files are downloaded successfully. See below the
files downloaded along with the CentOS 7 cloud image:
[alosadag@eko1 metal3-dev-env]$ ll /opt/metal3-dev-env/ironic/html/images
total 920324
-rw-rw-r--. 1 alosadag alosadag 942407680 Feb  3 12:39 CentOS-7-x86_64-GenericCloud-1907.qcow2
-rw-rw-r--. 1 alosadag alosadag        33 Feb  3 12:39 CentOS-7-x86_64-GenericCloud-1907.qcow2.md5sum
drwxr-xr-x. 2 root     root           147 Feb  3 12:41 ironic-python-agent-1862d000-59d9fdc6304b1
lrwxrwxrwx. 1 root     root            72 Feb  3 12:41 ironic-python-agent.initramfs -> ironic-python-agent-1862d000-59d9fdc6304b1/ironic-python-agent.initramfs
lrwxrwxrwx. 1 root     root            69 Feb  3 12:41 ironic-python-agent.kernel -> ironic-python-agent-1862d000-59d9fdc6304b1/ironic-python-agent.kernel
lrwxrwxrwx. 1 root     root            74 Feb  3 12:41 ironic-python-agent.tar.headers -> ironic-python-agent-1862d000-59d9fdc6304b1/ironic-python-agent.tar.headers
Afterwards, the script makes sure that libvirt is running successfully on the host and that the non-privileged user has permission to interact with it. Libvirt daemon should be running so that minikube can be installed successfully. See the following script snippet starting the minikube VM:
+ sudo su -l -c 'minikube start --insecure-registry 192.168.111.1:5000'
* minikube v1.6.2 on Centos 7.7.1908
* Selecting 'kvm2' driver from user configuration (alternates: [none])
In the same way, as with the host, container images are pre-cached but
in this case inside minikube local image repository. Notice that in this
case the Bare Metal
operator (BMO) is
also downloaded since it will run on minikube. The container location is
defined by BAREMETAL_OPERATOR_IMAGE. In case you want to test new
features or new fixes to the BMO, just change the value of the variable
to match the location of the modified image:
| Name of the variable | Default value |
| BAREMETAL_OPERATOR_IMAGE | quay.io/metal3-io/baremetal-operator |
Note
Remember that minikube is the management cluster in our environment. So it must run all the operators and controllers needed for Metal³.
Below is shown the output of the script once all the container images have been pulled to minikube:
+ sudo su -l -c 'minikube ssh sudo docker image ls' alosadag
REPOSITORY                                TAG                 IMAGE ID            CREATED             SIZE
quay.io/metal3-io/ironic                  latest              e5d81adf05ee        26 hours ago        693MB
quay.io/metal3-io/ironic-ipa-downloader   latest              d55b0dac2144        6 days ago          239MB
quay.io/metal3-io/ironic-inspector        latest              8bb5b844ada6        6 days ago          408MB
quay.io/metal3-io/baremetal-operator      latest              3c692a32ddd6        9 days ago          1.77GB
k8s.gcr.io/kube-proxy                     v1.17.0             7d54289267dc        7 weeks ago         116MB
k8s.gcr.io/kube-controller-manager        v1.17.0             5eb3b7486872        7 weeks ago         161MB
k8s.gcr.io/kube-scheduler                 v1.17.0             78c190f736b1        7 weeks ago         94.4MB
k8s.gcr.io/kube-apiserver                 v1.17.0             0cae8d5cc64c        7 weeks ago         171MB
kubernetesui/dashboard                    v2.0.0-beta8        eb51a3597525        7 weeks ago         90.8MB
k8s.gcr.io/coredns                        1.6.5               70f311871ae1        2 months ago        41.6MB
k8s.gcr.io/etcd                           3.4.3-0             303ce5db0e90        3 months ago        288MB
kubernetesui/metrics-scraper              v1.0.2              3b08661dc379        3 months ago        40.1MB
k8s.gcr.io/kube-addon-manager             v9.0.2              bd12a212f9dc        6 months ago        83.1MB
k8s.gcr.io/pause                          3.1                 da86e6ba6ca1        2 years ago         742kB
gcr.io/k8s-minikube/storage-provisioner   v1.8.1              4689081edb10        2 years ago         80.8MB
Once the container images are stored, minikube can be stopped. At that moment, the virtual networks shown in the previous picture are attached to the minikube VM as can be verified by the following command:
[alosadag@smc-master metal3-dev-env]$ sudo virsh domiflist minikube
Interface  Type       Source     Model       MAC
-------------------------------------------------------
-          network    default    virtio      d4:38:25:25:c6:ca
-          network    minikube-net virtio    a4:c2:8a:9d:2a:d8
-          network    provisioning virtio    52:54:00:c8:50:97
-          network    baremetal  virtio      52:54:00:17:b4:ec
Information
At this point the host is ready to create the virtual infrastructure.
The video below exhibits all the configurations explained and executed during this first step.
Step 2: Configure the host
In this step, the script 02_configure_host.sh basically configures the
libvirt/KVM virtual infrastructure and starts services in the host that
will be consumed by the virtual bare metal machines:
Web serverto expose theironic-python-agent(IPA) initramfs, kernel, headers and operating system cloud images.Virtual BMCto emulate a real baseboard management controller (BMC).Container registrywhere the virtual servers will pull the images needed to run a K8s installation.
Information
A baseboard management controller (BMC) is a specialized service processor that monitors the physical state of a computer, network server or other hardware device using sensors and communicating with the system administrator through an independent connection. The BMC is part of the Intelligent Platform Management Interface (IPMI) and is usually contained in the motherboard or main circuit board of the device to be monitored.
First, an ssh-key in charge of communicating to libvirt is created if it
does not exist previously. This key is called id_rsa_virt_power. It is
added to the root authorized_keys and is used by vbmc and sushy tools
to contact libvirt.
Information
sushy-tools is a set of simple simulation tools aiming at supporting
the development and testing of the Redfish protocol implementations.
Next, another Ansible playbook called
setup-playbook.yml
is run against the host. It is focused on setting up the virtual
infrastructure around metal3-dev-env. Below it is shown the Ansible
variables that are passed to the playbook, which actually are obtaining
the values from the global variables defined in the
common.sh or the configuration file.
ANSIBLE_FORCE_COLOR=true ansible-playbook \
    -e "working_dir=$WORKING_DIR" \
    -e "num_nodes=$NUM_NODES" \
    -e "extradisks=$VM_EXTRADISKS" \
    -e "virthost=$HOSTNAME" \
    -e "platform=$NODES_PLATFORM" \
    -e "libvirt_firmware=$LIBVIRT_FIRMWARE" \
    -e "default_memory=$DEFAULT_HOSTS_MEMORY" \
    -e "manage_baremetal=$MANAGE_BR_BRIDGE" \
    -e "provisioning_url_host=$PROVISIONING_URL_HOST" \
    -i vm-setup/inventory.ini \
    -b -vvv vm-setup/setup-playbook.yml
| Name of the variable | Default value |
|---|---|
| WORKING_DIR | /opt/metal3-dev-env |
| NUM_NODES | 2 |
| VM_EXTRADISKS | false |
| HOSTNAME | hostname |
| NODES_PLATFORM | libvirt |
| LIBVIRT_FIRMWARE | bios |
| DEFAULT_HOSTS_MEMORY | 8192 |
| MANAGE_BR_BRIDGE | y |
| PROVISIONING_URL_HOST | 172.22.0.1 |
Information
There are variables that are only defined as Ansible variables, e.g.
number of CPUs of the virtual bare metal server, size of disks, etc.
In case you would like to change properties not defined globally in
the metal3-dev-env take a look at the default variables specified in
role:
common
and
libvirt
The setup-playbook.yml is composed by 3 roles, which are detailed below:
- Common.
This role sets up the virtual hardware and network configuration of the VMs. Actually it is a dependency of the
libvirtandvirtbmcAnsible roles. This means that thecommonrole must always be executed before the roles that depend on them. Also, they are only executed once. If two roles state the same one as their dependency, it is only executed the first time.
- Libvirt.
It actually is the role that configures the virtual bare metal servers. They are all identically defined with the same hardware and network configuration. Note that they are not started since they will be booted later by ironic during the provisioning process.
Note
It is possible to change the number of VMs to provision by replacing
the value of NUMBER_NODES
Finally, once the VMs are defined and we have their MAC address, the
ironic inventory file ironic_nodes_json is created. The action of
creating a node is part of the enrollment process and the first step
to prepare a node to reach the available status.
{
  "nodes": [
    {
      "name": "node-0",
      "driver": "ipmi",
      "resource_class": "baremetal",
      "driver_info": {
        "username": "admin",
        "password": "password",
        "port": "6230",
        "address": "ipmi://192.168.111.1:6230",
        "deploy_kernel": "http://172.22.0.1/images/ironic-python-agent.kernel",
        "deploy_ramdisk": "http://172.22.0.1/images/ironic-python-agent.initramfs"
      },
      "ports": [
        {
          "address": "00:00:e0:4b:24:8b",
          "pxe_enabled": true
        }
      ],
      "properties": {
        "local_gb": "50",
        "cpu_arch": "x86_64"
      }
    },
    {
      "name": "node-1",
      "driver": "ipmi",
      "resource_class": "baremetal",
      "driver_info": {
        "username": "admin",
        "password": "password",
        "port": "6231",
        "address": "ipmi://192.168.111.1:6231",
        "deploy_kernel": "http://172.22.0.1/images/ironic-python-agent.kernel",
        "deploy_ramdisk": "http://172.22.0.1/images/ironic-python-agent.initramfs"
      },
      "ports": [
        {
          "address": "00:00:e0:4b:24:8f",
          "pxe_enabled": true
        }
      ],
      "properties": {
        "local_gb": "50",
        "cpu_arch": "x86_64"
      }
    },
Information
This role is also used to tear down the virtual infrastructure
depending on the variable
libvirt_action
inside the Ansible role: setup or teardown.
- VirtBMC
This role is only executed if the bare metal virtual machines are
created in libvirt, because vbmc needs libvirt to emulate a real
BMC.
info “Information”
VirtualBMC (vmbc) tool simulates a Baseboard Management Controller
(BMC) by exposing IPMI responder to the network and talking to libvirt
at the host vBMC is running at. Basically, manipulate virtual machines
which pretend to be bare metal servers.
The virtbmc Ansible role creates the vbmc and sushy-tools
configuration in the host for each virtual bare metal nodes. Note that
each virtual bare metal host will have a different vbmc socket
exposed in the host. The communication to each vbmc is needed by the
BMO to start, stop, configure the boot order, etc during the
provisioning stage. Finally, this folders containing the configuration
will be mounted by the vbmc and sushy-tools containers.
[alosadag@eko1 metal3-dev-env]$ sudo ls -l --color /opt/metal3-dev-env/virtualbmc
total 0
drwxr-x---. 2 root root 21 Feb  5 11:07 sushy-tools
drwxr-x---. 4 root root 70 Feb  5 11:08 vbmc
Next, both host provisioning and baremetal interfaces are configured.
The provisioning interface, as the name suggests, will be used to
provision the virtual bare metal hosts by means of the Bare Metal
Operator. This interface is configured with an static IP (172.22.0.1):
[alosadag@smc-master metal3-dev-env]$ ifconfig provisioning
provisioning: flags=4163<UP,BROADCAST,RUNNING,MULTICAST>  mtu 1500
    inet 172.22.0.1  netmask 255.255.255.0  broadcast 172.22.0.255
    inet6 fe80::1091:c1ff:fea1:6a0f  prefixlen 64  scopeid 0x20<link>
    ether 12:91:c1:a1:6a:0f  txqueuelen 1000  (Ethernet)
On the other hand, the baremetal virtual interface behaves as an external network. This interface is able to reach the internet and it is the network where the different Kubernetes nodes will exchange information. This interface is configured as auto, so the IP is retrieved by DHCP.
[alosadag@smc-master metal3-dev-env]$ ifconfig baremetal
baremetal: flags=4099<UP,BROADCAST,MULTICAST>  mtu 1500
    inet 192.168.111.1  netmask 255.255.255.0  broadcast 192.168.111.255
    ether 52:54:00:db:85:29  txqueuelen 1000  (Ethernet)
Next, an Ansible role called
firewall
will be executed targeting the host to be sure that the proper ports
are opened. In case your host is running Red Hat Enterprise Linux or
CentOS 8, firewall module will be used. In any other case, iptables
module is the choice.
Below is the code snippet where firewalld or iptables is assigned:
# Use firewalld on CentOS/RHEL, iptables everywhere else


export USE_FIREWALLD=False
if [[ ($OS == "rhel" || $OS = "centos") && ${OS_VERSION} == 8 ]]
then
 export USE_FIREWALLD=True
fi
Note
This behavior can be changed by replacing the value of the
USE_FIREWALLD variable
The ports managed by this role are all associated with the services that
take part in the provisioning process: ironic, vbmc, httpd, pxe,
container registry..
Note
Services like ironic, pxe, keepalived, httpd and the container registry are running in the host as containers attached to the host network on the host’s provisioning interface. On the other hand, the vbmc service is also running as a privileged container and it is listening in the host’s baremetal interface.
Once the network is configured, a local container registry is started.
It will be needed in the case of using locally built images. In that
case, the container images can be modified locally and pushed to the
local registry. At that point, the specific image location variable must
be changed so it must point out the local registry. This process makes
it easy to verify and test changes to the code locally.
At this point, the following containers are running inside two pods on the host: infra-pod and ironic-pod.
[root@eko1 metal3-dev-env]# podman pod list --ctr-names
POD ID         NAME         STATUS    CREATED      CONTAINER INFO                                             INFRA ID
67cc53713145   infra-pod    Running   6 days ago   [vbmc] [sushy-tools] [httpd-infra] [67cc53713145-infra]    f1da23fcd77f
5a0d475351aa   ironic-pod   Running   6 days ago   [5a0d475351aa-infra] [ipa-downloader]                      18f3a8f61407
Below are detailed the containers inside the infra-pod pod which are running as privileged using the host network:
- The httpd container. > > A folder called shared where the cloud OS image and IPA files are available is mounted and exposed to the virtual bare metal hosts.
sudo podman run -d --net host --privileged --name httpd-infra \
  --pod infra-pod -v /opt/metal3-dev-env/ironic:/shared --entrypoint \
   /bin/runhttpd quay.io/metal3-io/ironic
This folder also contains the
inspector.ipxefile which contains the information needed to be able to run theironic-python-agentkernel and initramfs. Below, httpd-infra container is accessed and it has been verified that host’s/opt/metal3-dev-env/ironic/(IRONIC_DATA_DIR) is mounted inside the shared folder of the container:
[alosadag@eko1 metal3-dev-env]$ sudo podman exec -it httpd-infra bash
[root@infra-pod shared]# cat html/inspector.ipxe
#!ipxe

:retry_boot
echo In inspector.ipxe
imgfree
# NOTE(dtantsur): keep inspection kernel params in [mdns]params in ironic-inspector-image
kernel --timeout 60000 http://172.22.0.1:80/images/ironic-python-agent.kernel ipa-inspection-callback-url=http://172.22.0.1:5050/v1/continue ipa-inspection-collectors=default,extra-hardware,logs systemd.journald.forward_to_console=yes BOOTIF=${mac} ipa-debug=1 ipa-inspection-dhcp-all-interfaces=1 ipa-collect-lldp=1 initrd=ironic-python-agent.initramfs || goto retry_boot
initrd --timeout 60000 http://172.22.0.1:80/images/ironic-python-agent.initramfs || goto retry_boot
boot
- The vbmc container.
This container mounts two host folders: one is
/opt/metal3-dev-env/virtualbmc/vbmcwherevbmcconfiguration for each node is stored, the other folder is/root/.sshwhere root keys are located, specificallyid_rsa_virt_powerwhich is used to manage the communication with libvirt.+ sudo podman run -d --net host --privileged --name vbmc --pod infra-pod -v /opt/metal3-dev-env/virtualbmc/vbmc:/root/> .vbmc -v /root/.ssh:/root/ssh quay.io/metal3-io/vbmc
- The sushy-tools container.
This container mounts the
/opt/metal3-dev-env/virtualbmc/sushy-toolsconfig folder and the/root/.sshlocal folder as well. The functionality is similar as thevbmc, however this use redfish instead of ipmi to connect to the BMC.+ sudo podman run -d --net host --privileged --name sushy-tools --pod infra-pod -v /opt/metal3-dev-env/virtualbmc/> sushy-tools:/root/sushy -v /root/.ssh:/root/ssh quay.io/metal3-io/sushy-tools
Information
At this point the virtual infrastructure must be ready to apply the
Kubernetes specific configuration. Note that all the VMs specified by
NUMBER_NODES and minikube must be shut down and the defined virtual
network must be active:
[alosadag@smc-master metal3-dev-env]$ sudo virsh list --all
 Id    Name                           State
----------------------------------------------------
 -     minikube                       shut off
 -     node_0                         shut off
 -     node_1                         shut off
 -     node_2                         shut off


[alosadag@smc-master metal3-dev-env]$ sudo virsh net-list --all
 Name                 State      Autostart     Persistent
----------------------------------------------------------
 baremetal            active     yes           yes
 default              active     yes           yes
 minikube-net         active     yes           yes
 provisioning         active     yes           yes
In the video below it is exhibited all the configuration explained and executed during this second step.
Step 3: Launch the management cluster (minikube)
The third script called 03_launch_mgmt_cluster.sh basically configures
minikube to become a Metal³ management cluster. On top of minikube the
baremetal-operator, capi-controller-manager,
capbm-controller-manager and cabpk-controller-manager are installed
in the metal3 namespace.
In a more detailed way, the script clones the Bare Metal Operator
(BMO) and Cluster
API Provider for Managed Bare Metal Hardware operator
(CAPBM)
git repositories, creates the cloud.yaml file and starts the minikube
virtual machine. Once minikube is up and running, the BMO is built and
executed in minikube’s Kubernetes cluster.
In the case of the Bare Metal Operator, the branch by default to clone
is master, however, this and other variables shown in the following
table can be replaced in the config file:
+ BMOREPO=https://github.com/metal3-io/baremetal-operator
+ BMOBRANCH=master
| Name of the variable | Default value | Options |
|---|---|---|
| BMOREPO | https://github.com/metal3-io/baremetal-operator | |
| BMOBRANCH | master | |
| CAPBMREPO | https://github.com/metal3-io/cluster-api-provider-baremetal | |
| CAPM3_VERSION | v1alpha3 | v1alpha4 or v1alpha3 |
| FORCE_REPO_UPDATE | false | |
| BMO_RUN_LOCAL | false | |
| CAPBM_RUN_LOCAL | false |
Once the BMO variables are configured, it is time for the operator to
be deployed using kustomize and kubectl as it can seen from the
logs:
Information: Kustomize is a Kubernetes tool that lets you customize raw, template-free YAML files for multiple purposes, leaving the original YAML untouched and usable as is.
+ kustomize build bmo-dirPrHIrcl
+ kubectl apply -f-
namespace/metal3 created
customresourcedefinition.apiextensions.k8s.io/baremetalhosts.metal3.io created
serviceaccount/metal3-baremetal-operator created
clusterrole.rbac.authorization.k8s.io/metal3-baremetal-operator created
clusterrolebinding.rbac.authorization.k8s.io/metal3-baremetal-operator created
configmap/ironic-bmo-configmap-75tkt49k5c created
secret/mariadb-password-d88m524c46 created
deployment.apps/metal3-baremetal-operator created
Once the BMO objects are applied, it’s time to transform the virtual
bare metal hosts information into a yaml file of kind BareMetalHost
Custom Resource (CR). This is done by a golang script passing them the
IPMI address, BMC username and password, which are stored as a
Kubernetes secret, MAC address and name:
+ go run /home/alosadag/go/src/github.com/metal3-io/baremetal-operator/cmd/make-bm-worker/main.go -address ipmi://192.168.111.1:6230 -password password -user admin -boot-mac 00:be:bc:fd:17:f3 node-0
+ read -r name address user password mac
+ go run /home/alosadag/go/src/github.com/metal3-io/baremetal-operator/cmd/make-bm-worker/main.go -address ipmi://192.168.111.1:6231 -password password -user admin -boot-mac 00:be:bc:fd:17:f7 node-1
+ read -r name address user password mac
+ go run /home/alosadag/go/src/github.com/metal3-io/baremetal-operator/cmd/make-bm-worker/main.go -address ipmi://192.168.111.1:6232 -password password -user admin -boot-mac 00:be:bc:fd:17:fb node-2
+ read -r name address user password mac
Below is shown the bare metal host definition of node-1. Note that the
IPMI address is the IP of the host’s provisioning interface. Behind the
scenes, IPMI is handled by the vbmc container running in the host.
---
apiVersion: v1
kind: Secret
metadata:
  name: node-1-bmc-secret
type: Opaque
data:
  username: YWRtaW4=
  password: cGFzc3dvcmQ=
---
apiVersion: metal3.io/v1alpha1
kind: BareMetalHost
metadata:
  name: node-1
spec:
  online: true
  bootMACAddress: 00:00:e0:4b:24:8f
  bmc:
    address: ipmi://192.168.111.1:6231
    credentialsName: node-1-bmc-secret
See that the MAC address configured in the BareMetalHost spec
definition matches node-1 provisioning interface:
[root@eko1 metal3-dev-env]# virsh domiflist node_1
Interface  Type       Source     Model       MAC
-------------------------------------------------------
vnet4      bridge     provisioning virtio      00:00:e0:4b:24:8f
vnet5      bridge     baremetal  virtio      00:00:e0:4b:24:91
Finally, the script apply in namespace metal3 each of the
BareMetalHost yaml files that match each virtual bare metal host:
+ kubectl apply -f bmhosts_crs.yaml -n metal3
secret/node-0-bmc-secret created
baremetalhost.metal3.io/node-0 created
secret/node-1-bmc-secret created
baremetalhost.metal3.io/node-1 created
secret/node-2-bmc-secret created
baremetalhost.metal3.io/node-2 created
Lastly, it is the turn of the CAPBM. Similar to BMO, kustomize is
used to create the different Kubernetes components and kubectl applied
the files into the management cluster.
Warning
Note that installing CAPBM includes installing the components of the
Cluster API and the
components of the Cluster API bootstrap provider
kubeadm
(CABPK)
Below the objects are created through the generate.sh script:
++ mktemp -d capbm-XXXXXXXXXX
+ kustomize_overlay_path=capbm-eJPOjCPASD


+ ./examples/generate.sh -f
Generated /home/alosadag/go/src/github.com/metal3-io/cluster-api-provider-baremetal/examples/_out/cluster.yaml
Generated /home/alosadag/go/src/github.com/metal3-io/cluster-api-provider-baremetal/examples/_out/controlplane.yaml
Generated /home/alosadag/go/src/github.com/metal3-io/cluster-api-provider-baremetal/examples/_out/metal3crds.yaml
Generated /home/alosadag/go/src/github.com/metal3-io/cluster-api-provider-baremetal/examples/_out/metal3plane.yaml
Generated /home/alosadag/go/src/github.com/metal3-io/cluster-api-provider-baremetal/examples/_out/machinedeployment.yaml
Generated /home/alosadag/go/src/github.com/metal3-io/cluster-api-provider-baremetal/examples/provider-components/provider-components-cluster-api.yaml
Generated /home/alosadag/go/src/github.com/metal3-io/cluster-api-provider-baremetal/examples/provider-components/provider-components-kubeadm.yaml
Generated /home/alosadag/go/src/github.com/metal3-io/cluster-api-provider-baremetal/examples/provider-components/provider-components-baremetal.yaml
Generated /home/alosadag/go/src/github.com/metal3-io/cluster-api-provider-baremetal/examples/_out/provider-components.yaml
Then, kustomize configures the files accordingly to the values defined
and kubectl applies them:
+ kustomize build capbm-eJPOjCPASD
+ kubectl apply -f-
namespace/cabpk-system created
namespace/capbm-system created
namespace/capi-system created
customresourcedefinition.apiextensions.k8s.io/baremetalclusters.infrastructure.cluster.x-k8s.io created
customresourcedefinition.apiextensions.k8s.io/baremetalmachines.infrastructure.cluster.x-k8s.io created
customresourcedefinition.apiextensions.k8s.io/baremetalmachinetemplates.infrastructure.cluster.x-k8s.io created
customresourcedefinition.apiextensions.k8s.io/clusters.cluster.x-k8s.io created
customresourcedefinition.apiextensions.k8s.io/kubeadmconfigs.bootstrap.cluster.x-k8s.io created
customresourcedefinition.apiextensions.k8s.io/kubeadmconfigtemplates.bootstrap.cluster.x-k8s.io created
customresourcedefinition.apiextensions.k8s.io/machinedeployments.cluster.x-k8s.io created
customresourcedefinition.apiextensions.k8s.io/machines.cluster.x-k8s.io created
customresourcedefinition.apiextensions.k8s.io/machinesets.cluster.x-k8s.io created
role.rbac.authorization.k8s.io/cabpk-leader-election-role created
role.rbac.authorization.k8s.io/capbm-leader-election-role created
role.rbac.authorization.k8s.io/capi-leader-election-role created
clusterrole.rbac.authorization.k8s.io/cabpk-manager-role created
clusterrole.rbac.authorization.k8s.io/cabpk-proxy-role created
clusterrole.rbac.authorization.k8s.io/capbm-manager-role created
clusterrole.rbac.authorization.k8s.io/capbm-proxy-role created
clusterrole.rbac.authorization.k8s.io/capi-manager-role created
rolebinding.rbac.authorization.k8s.io/cabpk-leader-election-rolebinding created
rolebinding.rbac.authorization.k8s.io/capbm-leader-election-rolebinding created
rolebinding.rbac.authorization.k8s.io/capi-leader-election-rolebinding created
clusterrolebinding.rbac.authorization.k8s.io/cabpk-manager-rolebinding created
clusterrolebinding.rbac.authorization.k8s.io/cabpk-proxy-rolebinding created
clusterrolebinding.rbac.authorization.k8s.io/capbm-manager-rolebinding created
clusterrolebinding.rbac.authorization.k8s.io/capbm-proxy-rolebinding created
clusterrolebinding.rbac.authorization.k8s.io/capi-manager-rolebinding created
secret/capbm-webhook-server-secret created
service/cabpk-controller-manager-metrics-service created
service/capbm-controller-manager-service created
service/capbm-controller-metrics-service created
deployment.apps/cabpk-controller-manager created
deployment.apps/capbm-controller-manager created
deployment.apps/capi-controller-manager created
Information
At this point all controllers and operators must be running in the
namespace metal3 of the management cluster (minikube). All virtual
bare metal hosts configured must be shown as BareMetalHosts
resources in the metal3 namespace as well. They should be in ready
status and stopped (online is false)
In the video below it is exhibited all the configuration explained and executed during this third step.
Step 4: Verification
The last script 04_verify.sh is in charge of verifying that the
deployment has been successful by checking several things:
- Custom resources (CR) and custom resource definition (CRD) were applied and exist in the cluster.
- Verify that the virtual bare metal hosts matches the information
detailed in the
BareMetalHostobject. - All containers are in running status.
- Verify virtual network configuration and status.
- Verify operators and controllers are running.
However, this verification can be easily achieved manually. For instance, checking that controllers and operators running in the management cluster (minikube) and all the virtual bare metal hosts are in ready status:
[alosadag@eko1 ~]$ kubectl get pods -n metal3 -o wide
NAME                                         READY   STATUS    RESTARTS   AGE     IP               NODE       NOMINATED NODE   READINESS GATES
cabpk-controller-manager-5c67dd56c4-wfwbh    2/2     Running   9          6d23h   172.17.0.5       minikube   <none>           <none>
capbm-controller-manager-7f9b8f96b7-grl4r    2/2     Running   12         6d23h   172.17.0.4       minikube   <none>           <none>
capi-controller-manager-798c76675f-dxh2n     1/1     Running   10         6d23h   172.17.0.6       minikube   <none>           <none>
metal3-baremetal-operator-5b4c59755d-h4zkp   6/6     Running   8          6d23h   192.168.39.101   minikube   <none>           <none>
Verify that the BareMetalHosts provisioning status is ready and the
BMC configuration is correct. Check that all virtual bare metal hosts
are shut down (online is false):
[alosadag@eko1 ~]$ kubectl get baremetalhosts -n metal3
NAME     STATUS   PROVISIONING STATUS   CONSUMER             BMC                         HARDWARE PROFILE   ONLINE   ERROR
node-0   OK       ready                                      ipmi://192.168.111.1:6230   unknown            false
node-1   OK       ready                                      ipmi://192.168.111.1:6231   unknown            false
node-2   OK       ready                                      ipmi://192.168.111.1:6232   unknown            false
Get the list of CRDs created in the cluster. Check that, at least, the following ones exist:
[alosadag@eko1 ~]$ kubectl get crds
NAME                                                        CREATED AT
baremetalclusters.infrastructure.cluster.x-k8s.io           2020-01-22T13:19:42Z
baremetalhosts.metal3.io                                    2020-01-22T13:19:35Z
baremetalmachines.infrastructure.cluster.x-k8s.io           2020-01-22T13:19:42Z
baremetalmachinetemplates.infrastructure.cluster.x-k8s.io   2020-01-22T13:19:42Z
clusters.cluster.x-k8s.io                                   2020-01-22T13:19:42Z
kubeadmconfigs.bootstrap.cluster.x-k8s.io                   2020-01-22T13:19:42Z
kubeadmconfigtemplates.bootstrap.cluster.x-k8s.io           2020-01-22T13:19:42Z
machinedeployments.cluster.x-k8s.io                         2020-01-22T13:19:43Z
machines.cluster.x-k8s.io                                   2020-01-22T13:19:43Z
machinesets.cluster.x-k8s.io                                2020-01-22T13:19:43Z
Information
KUBECONFIG file is stored in the user’s home directory
(~/.kube/config) that executed the scripts.
Check the status of all the applications running in minikube or better said, in the management cluster.
[alosadag@smc-master logs]$ kubectl get pods -A
NAMESPACE     NAME                                        READY   STATUS    RESTARTS   AGE
kube-system   coredns-6955765f44-fkdzp                    1/1     Running   1          164m
kube-system   coredns-6955765f44-fxzvz                    1/1     Running   1          164m
kube-system   etcd-minikube                               1/1     Running   1          164m
kube-system   kube-addon-manager-minikube                 1/1     Running   1          164m
kube-system   kube-apiserver-minikube                     1/1     Running   1          164m
kube-system   kube-controller-manager-minikube            1/1     Running   1          164m
kube-system   kube-proxy-87g98                            1/1     Running   1          164m
kube-system   kube-scheduler-minikube                     1/1     Running   1          164m
kube-system   storage-provisioner                         1/1     Running   2          164m
metal3        cabpk-controller-manager-5c67dd56c4-rldk4   2/2     Running   0          156m
metal3        capbm-controller-manager-7f9b8f96b7-mdfcw   2/2     Running   0          156m
metal3        capi-controller-manager-84947c7497-k6twl    1/1     Running   0          156m
metal3        metal3-baremetal-operator-78bffc8d-z5hqs    6/6     Running   0          156m
In the video below it is exhibited all the configuration explained and executed during the verification steps.
Summary
In this post a deep dive into the metal3-dev-env scripts was shown. It
has been deeply detailed the process of creating a Metal³ emulated
environment from a set of virtual machines (VMs) to manage as if they
were bare metal hosts.
After this post, the reader should have acquired a basic understanding of all the pieces involved in the Metal³ project. Also, and more important, how these scripts can be adapted to your specific needs. Remember that this can be achieved in multiple ways: replacing values in the global variables, replacing Ansible default variables or even modifying playbooks or the scripts themselves.
Notice that the Metal³ development environment also focuses on developing new features of the BMO or CAPBM and being able to test them locally.